Author Archive for Emilie Musson

Visual Basics Tip: Future Proofing Code

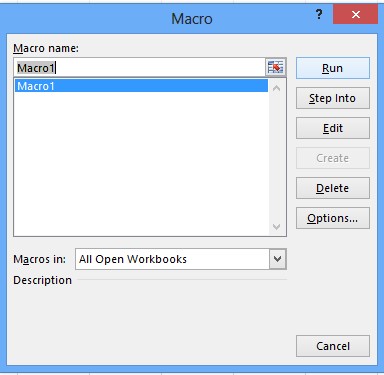
There are several ways you can future proof your code in Visual Basic. By using the Macro Dialogue Box in Excel (as well as Word) you can make sure your colleagues can understand the purpose and general use of the Macro you record or write.  To use the Macro Dialogue Box to is advantage. Here the best ways on how to do so:


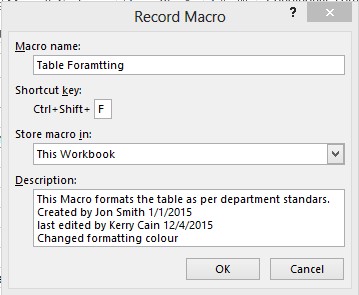
Give your macro a user friendly name.

Always give your macros a user-friendly name, or agree a naming procedure for your Macros so that everyone knows what they are for. This may seem a bit like stating the obvious, but if your Macro is there to format a table, then give it a name that would summarize what it formats and keep it memorable and concise. Naming a Macro No.14 isn’t really going yourself or others any favors when debugging any problems.


Add the shift button to any key short cuts.

Always add the Shift button to any key shortcuts. A CTRL+Key shortcut will disable its MS predefined purpose, so If you add CTRL+C shortcut to your macro and run it, you will not be able to use that short key to copy text or cells.


Use the description box to explain the Macro.

Always use the description box to add as much info about the Macro as possible and dates when it was edited. This way you can always know what went wrong and when and by who, not to point blame but to understand what happened and minimize time spent on investigating the problem.


future


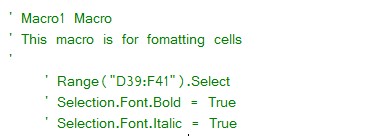
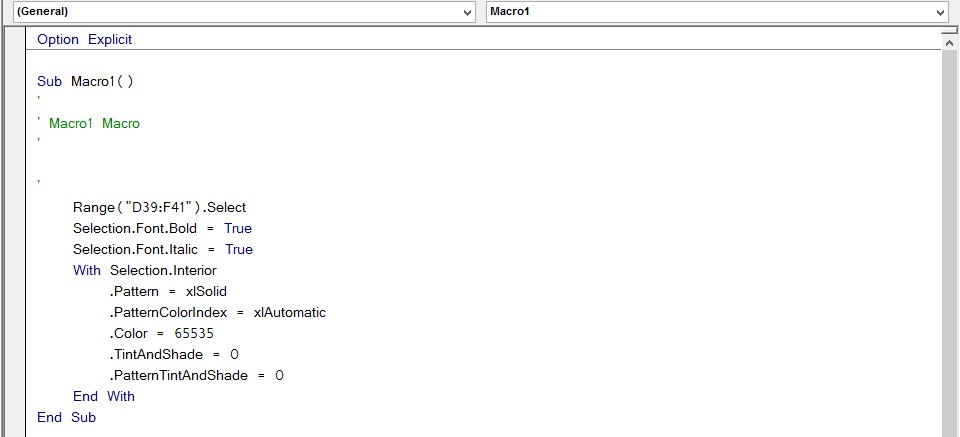
Use comments when you write a code.

Commenting can also be very handy when writing new code, recycling code or adding more details to your existing code to help others understand the purpose of your code.


Adding a comment is fairly easy. Go to your line of code and add an apostrophe (‘) in front of it. Anything on that line will turn green indicating that VBA is not recognizing it as a line of code, but seeing it a comment or note.


marco


Always use commenting creatively to lines of code you are unsure of, as well as adding notes to your code for people to see what that block of code is meant to do. You could also use the apostrophe to debug the code if it is not working correctly or clashing with another line of coding. Or instead of deleting code, you can use commenting to leave the code where it is and come back to it at a later stage.             


fg


If you want any other tips on Microsoft VBA then have a look at our other tips on Recycling Code and The Macro feature.


Want more information on Visual Basic? Then look no further, check out our VBA Courses and VBA Hints and Tips. 


Need more help? Then we’re here –> Message us on Facebook and Twitter 


Visual Basic Tip: The Macro Feature

Recording Macros is brilliant! Especially if you are not sure on how to word something initially. If you can’t decide what to use in your code, try recording macros that similar to what you are trying to do and see what is entailed in the code. The obvious next step would be to remove any unwanted or redundant code.


The first step is record a Macro. The best way to do this is click the Record Macro Button which is found on the Status Bar (the green bar at the bottom of your excel sheet).


njk


Then, the Record Macro Dialogue box appears.


huh


Be sure to fill out the Name and Description boxes with as much details as you can to future proof your Macro, as per below.


future


Click OK.  Now you will have to format the table as you would normally in Excel. Excel will record your steps as a Macro. Click the Record Macro button again to stop recording.


Next would be to view the Macros. To do this, Find the View Tab on the Ribbon, go to the Macro command group, and select View Macros.


ot


Click on the Edit button and this will bring up your Macro in Visual Basic. If you look at the screen grab below, you will see a simple Macro for selecting a range of cells and formatting it with bold, italic and adding a background colour.

 
fit


This should now give you an idea of the sentencing required to create a macro that grabs a group cells, formats it and adds background colour. Now all you have to do is use your VB know how and adapt the code to something more practical and universal that applies to all cells. Just remember to remove any redundant lines (for example .tintandShade = 0 isn’t needed so you can delete it).


Once your happy with your Macro, then add the code you think will work best (like looping or IF statements). By using this simple way of recording Macros and then editing them to your needs you can save yourself a huge amount of time writing code from scratch.


If found this hint and tip useful, you can always check out our Recycle Code tip for more ideas.


Want more information on Visual Basic? Then look no further, check out our VBA Courses and VBA Hints and Tips. 


For more hints and tips on other Microsoft Office applications sign up to our Mailing List.


Microsoft Outlook Tip: Setting Up a Meeting

Outlook is a great tool for not just sending and receiving emails, but for also incorporating your day-to-day happenings in the office. Calendar tools can help with setting meetings, appointments and plan your day.


To set up a meeting in Outlook, go to the Home tab on the Ribbon, select New Items and then select Meeting.


Once you do that, you will get the New Meeting Dialogue Box.


outlook.2


It is easy to invite people to a meeting by using the ‘To‘ box and adding a subject in the ‘Subject Box’. You can also schedule a time and date by adding them into the ‘Start/End Time’ box as shown in the picture above. It is also possible to schedule a meeting for the entire day, simple click the ‘All Day Event‘ button.


Fancy learning  more about how Outlook can benefit your business? Then have a look at our Outlook courses.


Let us know what you think and message us on Facebook and Twitter

Microsoft Word Tip: Creating a Header

If you want to create a poster or letter document in Microsoft word, then it could be useful to use the Header option, to give your document a professional look. The header feature allows the user to add smart looking areas in the top, bottom and side margins of a document.


Why is using a header or footer useful? well many online forums would suggest that when sending a document with a header, employers see a strong level of professionalism and that it shows that you have a good knowledge of using Microsoft word.


To use this feature, simply click the Insert Tab, and then in the Header and Footer group, Select either a header of footer.


Picture1


From the Drop Down Menu below the Header option, Select which Design you would like.


Design Drop Down Menu


Once you have selected the Design Template then you can Customise it to how you like. To customise the header,  select the Edit Header option shown at the bottom of the picture above. The customise steps are simple and easy to follow and it will give you the freedom to design exactly how you would like the header to look.


See our other Microsoft Word Hints and Tips.


Don’t forget to follow us on Twitter and Facebook.

Microsoft OneNote Tip: Recording Feature

Have you ever been sat in a lecture trying to write notes fast enough and listen to the speaker? Well maybe you didn’t know about this brilliant Recording Feature on Microsoft OneNote.


OneNote offers an option to create Visual and Audio notes through a recording feature that is situated upon the Top Button Tab like shown below.


Microsoft OneNote: Feature Tab


This feature helps you to  make quick notes on the go, just by simply recording in vocal mode. If you have a little more time then it could be useful to record in video mode, both visual and audio notes can be shared with your colleagues and contacts through OneDrive.


All you have to do is click the recording icon and it will automatically start recording, however if you record in visual mode then you may have to accept permission to access the webcam. When you would like to stop recording,  there is a large Stop button next to the icon.


So, if your ever in a lecture and don’t want to loose any important facts or information then don’t forget to try out this recording feature.


We hope you found this tip helpful, Check out our other OneNote Courses


News: Infero Delivers Training In London

Yes, you read this title correctly. Here at Infero Training have branched out and we now deliver training in London. This now makes it our 8th location where we can deliver courses.


London


Many customers within the south started asking if we could provide courses near London. With London being one of the leading global cities with many strengths, it was a prime location for many of our customers. With that in mind, we made the decision and here we are; new venue.


We will be setting dates for courses in London soon, so keep an eye out.

Article: International Woman’s day

To not too many people’s knowledge, today is International Women’s Day (8th March). It is a day to celebrate equality and feminism for women, dating all the way back to 1912. It is an annually celebrated event that involves everyone across the globe to join in and support.


iwd_logo_1502261415


Not only does this day reflect the past of the women who fought for women’s rights but it celebrates the achievements in today’s society. Across the globe, millions of women are celebrating equality and the history that accompanies it.


Before the start of the First World War, women were forced to do jobs that men didn’t want to do and were paid a low wage for doing so. Most of the job roles required hard work, doing manual labouring jobs across long working days, since most men joined the army, most women became part of the homeland force. The homeland force turned women into factory workers that created equipment and weapons for the army. As well as working, they also had the job of providing for the family, taking care of children, and the household. Throughout this time women were not entitled to vote or have the right to be treated equally. Therefore an organisation named the ‘suffragettes’ decided to take action and stand up for women’s rights. They protested and organised demonstrations throughout the country, as well as challenging the law and the courts. If it wasn’t for these women, our lives and jobs today would be so different.


However, even in today’s society some women still feel as if they cannot do some job roles, as they are mainly male orientated, especially in business and IT. We believe that all women and men are equal and should be praised for doing any job whilst being paid the same wage. Each year, more and more women are joining the IT industry and big companies are inspiring those women to pursue and continue a career in this sector. So if you have a dream to work within the IT industry, but don’t feel confident in doing so, then remember to always push yourself to achieve your goals and strive forward when doing so. Being a women is empowering and should never hold you back.


For more information, see the International Women’s Day page


Microsoft PowerPoint Tip: Creating Themes

A great feature in Microsoft PowerPoint is the ability to design your own theme and layout. It allows the user to freely design their slides and deliver quality presentations that are suited to their business style.


To create your own personalized theme, simply open a new blank presentation and click on the View Tab. Now in the Master Views Group, select Slide Master.


Microsoft PowerPoint: Slide Master Tab


The Slide Master is the largest picture out of all the others in the slide thumbnail drop down. Other slide layouts are situated underneath the slide master.


Microsoft PowerPoint: Slide Master Tab


To allocate changes to the slide master/slide layouts, select the Slide Master tab, and try the following:


  •  Try a Microsoft PowerPoint: Theme options
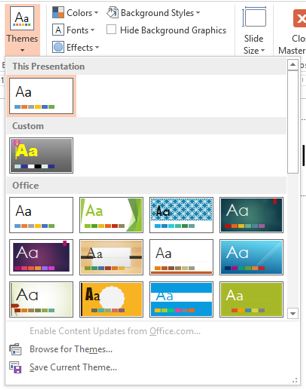
colorful theme and add special fonts and effects, or click Themes, and choose a theme from the gallery. Use the scroll-bar on the right to see more themes.


  • To change the background, select Background Styles, and choose a background from the drop down menu.


  • To add a placeholder (add’s  text,  pictures, chart, videos, sound, and other objects), select the Insert Placeholder option in the tool bar , now select the option you would like to add into the slide.

Microsoft PowerPoint: PlaceHolder Tab


We hope you found this tip helpful. For any other tips on PowerPoint, Check out our PowerPoint Tips


Also, Get Social! Follow us on Facebook and Twitter

Office 365 Tip: Creating Sites

Office 365 Sites are a good way of creating social pages for your business and creating spaces where various departments can share, interact and store information that only they can access. So here is how to create one.


To create a Site, Log on to your Office 365 account and if you are an administrator, find the Admin Tab.


Picture1
Under Admin, Click on SharePoint and under site collection a new Ribbon will appear.


Picture1


Click on New then Private Site Collection as per picture below and a pop up Site Wizard window will appear, fill out all the spaces. You will need to give your site a unique name. I would consider naming by Department or Function of the site to make it easy to find.


Picture1Picture1


Picture1


Add a person as a Administrator to help control what happens on the site and allow for a person to be responsible for adding documents, other employees….etc to the site.


Picture1
Once you have created your Site, it will look something similar to this:


Picture1


Sites can be very useful especially if certain individuals are constantly moving or traveling, or want to access certain documents and contact other individuals without the need to access files remotely. Like much of Office 365, Sites can also be accessed via a tablet, smart phone or ay hand held device with Internet connectivity.


Found this tip helpful? then let us know via our Facebook and Twitter pages.


News: Valentine’s Day Offer

Valentine’s Day is nearly upon us, and here at Infero, we are feeling the love. We got a heart felt offer that no one can refuse. We want everyone to enjoy Valentines Day so why not treat yourself or your colleagues and receive a free gift!


chocolates-491165_960_720


Throughout the whole of February we are offering a free box of specialized chocolates when you book on any of our courses. Just call us to book a course and quote ‘Valentine’s day’ to receive a box of special chocolates. What is a better way to learn than in a love-filled environment? So don’t miss out on a fantastic offer and book today.


Don’t forget to let us know what you think about our offer, and get social on our Facebook and Twitter pages